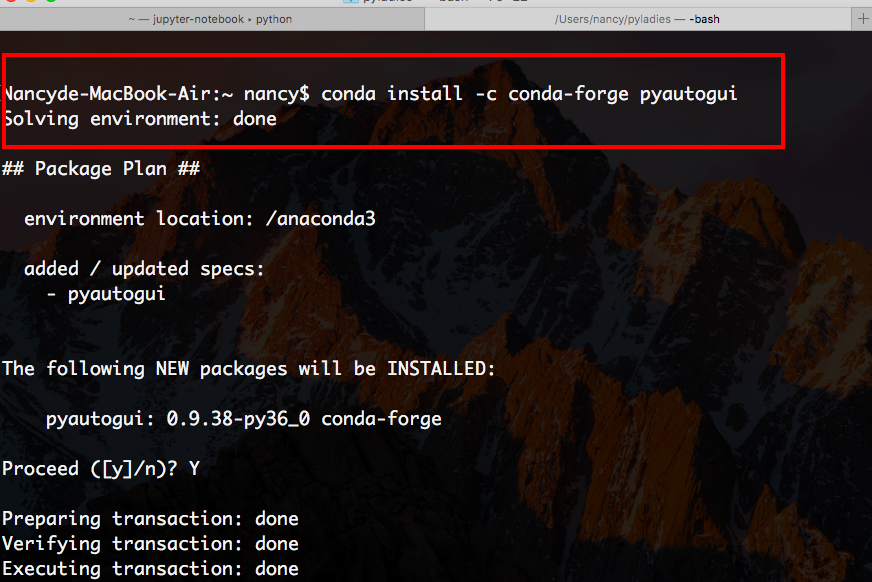
Check Modules Exist
You don't need to install time, because time is in standard library.
Without Error Massage!!
import pyautogui
import time
Let's Start!
pyautogui Module
- PyAutoGUI can simulate
- moving the mouse
- clicking the mouse
- dragging with the mouse
- pressing keys
- pressing and holding keys
- pressing keyboard hotkey combinations.
If pyautogui Too Fast/Out of Control
- Shutting down everything by logging out
How to Prevent
- Wait n seconds for each PyAutoGUI function call
- Moving the mouse cursor to the upper-left corner of the screen will raise the pyautogui.FailSafeException
import pyautogui
pyautogui.PAUSE = 1 #default 0.1s
pyautogui.FAILSAFE = True #default True
Controlling Mouse Movement
Find Cursor Location
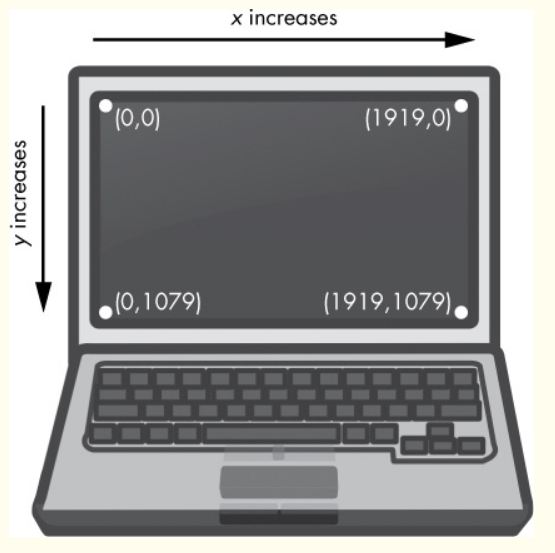
- The upper-left corner of the screen (x, y) = (0, 0)
- The x coordinate increases going to right, and the y coordinate increases going down
- All coordinates are positive integers

Screen Size and on the Screen
Return tuple of integer: (width, height) for size of your main monitor
pyautogui.size()
Check if XY coordinates are on the screen
pyautogui.onScreen(x, y)
In [2]:
import pyautogui
print(pyautogui.size())
pyautogui.onScreen(0,1000)
(1440, 900)
Out[2]:
False
Store the width and height as variables for better readability in your programs
In [12]:
width, height = pyautogui.size()
Moving the Mouse
pyautogui.moveTo(x, y, duration=seconds)
#If 0, then the mouse cursor is moved instantaneously. 0.0 by default.
pyautogui.moveRel(xOffset, yOffset, duration=seconds)
- duration: The amount of time it takes to move the mouse cursor to the new xy coordinates.
In [21]:
for i in range(5):
    pyautogui.moveTo(100, 100, duration=0.25)
    pyautogui.moveTo(200, 100, duration=0.25)
    pyautogui.moveTo(200, 200, duration=0.25)
    pyautogui.moveTo(100, 200, duration=0.25)
In [3]:
for i in range(5):
    pyautogui.moveRel(100, 0, duration=0.25)
    pyautogui.moveRel(0, 100, duration=0.25)
    pyautogui.moveRel(-100, 0, duration=0.25)
    pyautogui.moveRel(0, -100, duration=0.25)
Getting the Mouse Position
pyautogui.position()
Return x and y of your cursor on screen now
In [2]:
pyautogui.position()
Out[2]:
(326, 223)
Project : “Where Is the Mouse Right Now?”
Aim :
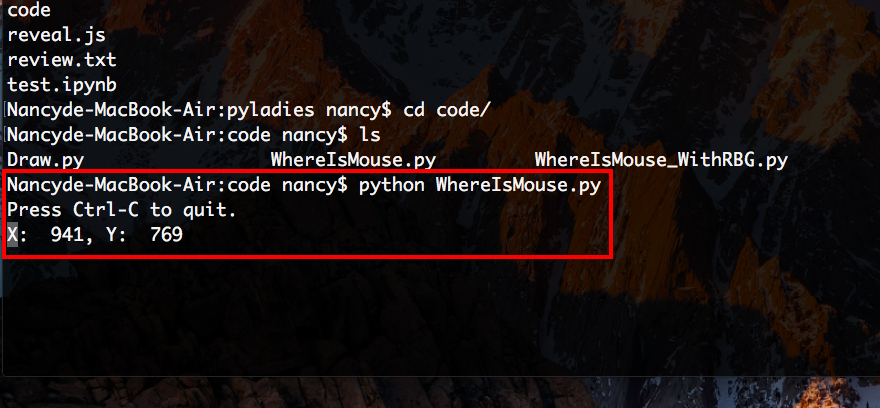
- Display the current x and y coordinate of the mouse cursor.
- Update these coordinates as the mouse moves around the screen.
Demo

Step 1: Import the Module
In [5]:
import pyautogui
print('Press Ctrl-C to quit.')
Press Ctrl-C to quit.
Step 2: Set Up the Quit Code and Infinite Loop
In [ ]:
try:
    while True:
    # TODO: Get and print the mouse coordinates.
except KeyboardInterrupt:
    print('\nDone.')
In [ ]:
x, y = pyautogui.position()
positionStr = 'X: ' + str(x).rjust(4) + ', Y: ' + str(y).rjust(4)
print(positionStr, end='')
print('\b' * len(positionStr), end='', flush=True)
Program File
Please download WhereIsMouse.py and execute WhereIsMouse.py in terminal.
Or execute program below on Jupyter notebook
from IPython.display import display, clear_output
import pyautogui
import time

try:
    while True:
        # TODO: Get and print the mouse coordinates.
        x, y = pyautogui.position()
        positionStr = 'X: ' + str(x).rjust(4) + ', Y: ' + str(y).rjust(4)
        display(positionStr)
        time.sleep(0.2)
        clear_output(wait=True)
except:
    print('\nDone.')
Controlling Mouse Interaction
Clicking the Mouse
pyautogui.click(x, y, button='left')
pyautogui.mouseDown(x, y, button='left')
pyautogui.mouseUp(x, y, button='left')
# or multiple clicks
pyautogui.click(clicks=3, interval=0.25, button='right')
pyautogui.doubleClick(x, y)
- Button could be left, right or middle to specify which you want
In [31]:
import pyautogui
pyautogui.click(400, 300)
Equal
In [25]:
import pyautogui
pyautogui.mouseDown(400, 300)
pyautogui.mouseUp(400, 300)
Dragging the Mouse
pyautogui.dragTo(x, y, duration=2)
pyautogui.dragRel(xOffset, yOffset, duration=0.25, button='right')
In [1]:
### demo
import pyautogui
#drag google chrome icon in dock
pyautogui.moveTo(910, 880)
pyautogui.dragTo(985, 880, duration=2)
pyautogui.dragRel(-75, 0, duration=2)
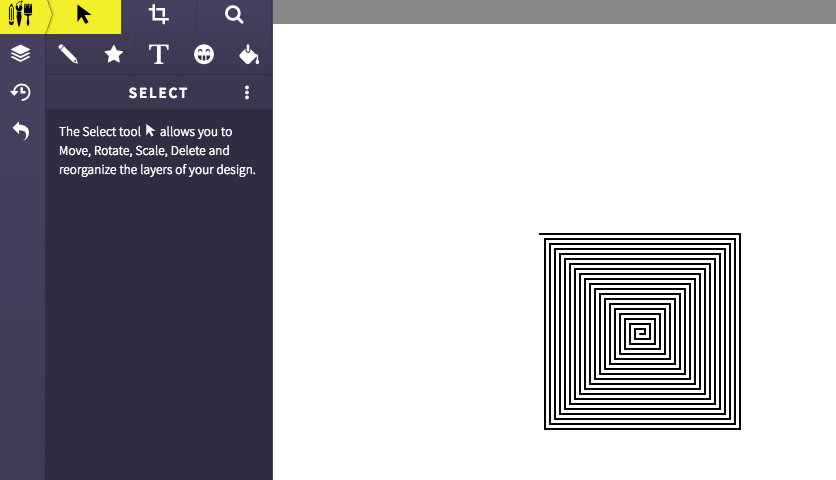
Project : “Drawing with pyautogui”
During program sleep :
Try to move the mouse cursor over the drawing window and select pencil/brush
Online sketch
In [ ]:
import pyautogui, time
time.sleep(5)
pyautogui.click()
distance = 200
while distance > 0:
    pyautogui.dragRel(distance, 0, duration=0.2)   # move right
    distance = distance - 5
    pyautogui.dragRel(0, distance, duration=0.2)   # move down
    pyautogui.dragRel(-distance, 0, duration=0.2)  # move left
    distance = distance - 5
    pyautogui.dragRel(0, -distance, duration=0.2)  # move up
In [46]:
import pyautogui
import time
pyautogui.moveRel(0,200, duration=1)
for i in range(3):
    time.sleep(2)
    pyautogui.scroll(-3)
Working with the Screen
Getting a Screenshot
pyautogui.screenshot()
pyautogui.screenshot(region=(left, top, width, height))
#(left, top) is the upper left corner
In [3]:
import pyautogui, time
import os
time.sleep(2)
im = pyautogui.screenshot(imageFilename='screenshot.png',region=(360, 225, 500, 450))

#current directory
print(os.getcwd())
im
/Users/nancy/pyladies
Out[3]:
Color of the Pixel at Coordinate in Image
In [16]:
im.getpixel((0, 0))
Out[16]:
(41, 36, 48, 255)
Recognize Color
pyautogui.pixelMatchesColor(x, y, (R, G, B))
- If the pixel at the given x- and y-coordinate on the screen matches the given color, pixelMatchesColor() function will return True
In [17]:
time.sleep(1)
pyautogui.pixelMatchesColor(360, 225, (41, 36, 48))
Out[17]:
True
Project: "Extending the WhereIsMouse Program"
#! python
import pyautogui
print('Press Ctrl-C to quit.')
try:
    while True:
        # TODO: Get and print the mouse coordinates.
        x, y = pyautogui.position()
        positionStr = 'X: ' + str(x).rjust(4) + ' Y: ' + str(y).rjust(4)
        # Add Code Here!!!!!
        # Add Code Here!!!!!
        # Add Code Here!!!!!
        # Add Code Here!!!!!
        print(positionStr, end='')
        print('\b' * len(positionStr), end='', flush=True)
except KeyboardInterrupt:
    print('\nDone.')
Download full code here WhereIsMouse_WithRBG.py
Add below code into WhereIsMouse.py
pixelColor = pyautogui.screenshot().getpixel((x, y))
positionStr += ' RGB: (' + str(pixelColor[0]).rjust(3)
positionStr += ', ' + str(pixelColor[1]).rjust(3)
positionStr += ', ' + str(pixelColor[2]).rjust(3) + ')'
Image Recognition
Use image previously taken by screenshot

In [7]:
import pyautogui
import time
time.sleep(2)
pyautogui.locateOnScreen('Img/screenshot.png')
#Returns (left, top, width, height) coordinate of first found instance of the image on the screen.
Out[7]:
(10, 30, 600, 400)
In [9]:
time.sleep(1)
print(pyautogui.locateAllOnScreen('Img/screenshot.png'))
list(pyautogui.locateAllOnScreen('Img/screenshot.png'))
<generator object _locateAll_python at 0x11442bbf8>
Out[9]:
[(10, 30, 600, 400)]
Controlling the Keyboard
Sending a String from the Keyboard
pyautogui.typewrite(string, seconds)
Try to open text editor or Google Doc during program sleep, pyautogui will keyin Hello world!
In [20]:
import time, pyautogui
time.sleep(10)
pyautogui.click(100, 100)
pyautogui.typewrite('Hello world!', 0.25)
Key Names
pyautogui.typewrite(['KeyName',...], seconds)
| Keyboard Key String | Meaning |
|---|---|
| 'a', 'b', 'c', 'A', 'B', 'C', '1', '2', '3', '!', '@', '#', and so on | The keys for single characters |
| 'left' | The left arrow keys |
- PyAutoGUI KEYBOARD_KEYS
In [2]:
import time, pyautogui
time.sleep(10)
pyautogui.click(100, 100)
pyautogui.typewrite(['O', 'l', 'l', 'y', '!', '!', 'left', 'left', ' ', ',', 'H', 'I'], 0.25)
| Keyboard Key String | Meaning |
|---|---|
| 'a', 'b', 'c', 'A', 'B', 'C', '1', '2', '3', '!', '@', '#', and so on | The keys for single characters |
| 'enter' (or 'return' or '\n') | The ENTER key |
| 'esc' | The ESC key |
| 'shiftleft', 'shiftright' | The left and right SHIFT keys |
| 'altleft', 'altright' | The left and right ALT keys |
| 'ctrlleft', 'ctrlright' | The left and right CTRL keys |
| 'tab' (or '\t') | The TAB key |
| 'backspace', 'delete' | The BACKSPACE and DELETE keys |
| 'pageup', 'pagedown' | The PAGE UP and PAGE DOWN keys |
| 'home', 'end' | The HOME and END keys |
| 'up', 'down', 'left', 'right' | The up, down, left, and right arrow keys |
| Keyboard Key String | Meaning |
|---|---|
| 'f1', 'f2', 'f3', and so on | The F1 to F12 keys |
| 'volumemute', 'volumedown', 'volumeup' | The mute, volume down, and volume up keys (some keyboards do not have these keys, but your operating system will still be able to understand these simulated keypresses) |
| 'pause' | The PAUSE key |
| 'capslock', 'numlock', 'scrolllock' | The CAPS LOCK, NUM LOCK, and SCROLL LOCK keys |
| 'insert' | The INS or INSERT key |
| 'printscreen' | The PRTSC or PRINT SCREEN key |
| 'winleft', 'winright' | The left and right WIN keys (on Windows) |
| 'command' | The Command () key (on OS X) 'option' The OPTION key (on OS X) |
Pressing and Releasing the Keyboard
pyautogui.keyDown(key)
pyautogui.keyUpd(key)
How to hold the SHIFT key to get "$"?
In [10]:
import time, pyautogui
time.sleep(10)
pyautogui.click(500, 500)
pyautogui.keyDown('shift')
pyautogui.press('4')
pyautogui.keyUp('shift')
Hotkey Combinations
In [6]:
import pyautogui
pyautogui.keyDown('ctrl')
pyautogui.keyDown('a')
pyautogui.keyDown('c')
pyautogui.keyUp('c')
pyautogui.keyUp('a')
pyautogui.keyUp('ctrl')
Equal
In [7]:
import pyautogui
pyautogui.hotkey('ctrl', 'a', 'c')
Exercise
Open browser, type in url, launch Konami Code
- Use subprocess module to open browser
- Input url and remember to press enter
- Focus on the center of screen
- Press Konami Code
Demo
Answer
In [19]:
import time, pyautogui, subprocess
subprocess.Popen(['open', '/Applications/Safari.app/'])
time.sleep(1)
pyautogui.typewrite('https://playoverwatch.com/zh-tw/', interval=0.25)
pyautogui.press('enter')
time.sleep(1)
x, y = pyautogui.size()
time.sleep(1)
pyautogui.click(x/2, y/2)
pyautogui.press(['up', 'up', 'down', 'down', 'left', 'right', 'left', 'right', 'b', 'a'], interval=0.5)


